|
|
Post by Zach on Feb 12, 2020 8:36:46 GMT
Two more corps almost done. Once I fill in the missing pieces from IV Corps I'll have II Corps, III Corps, and IV finished. 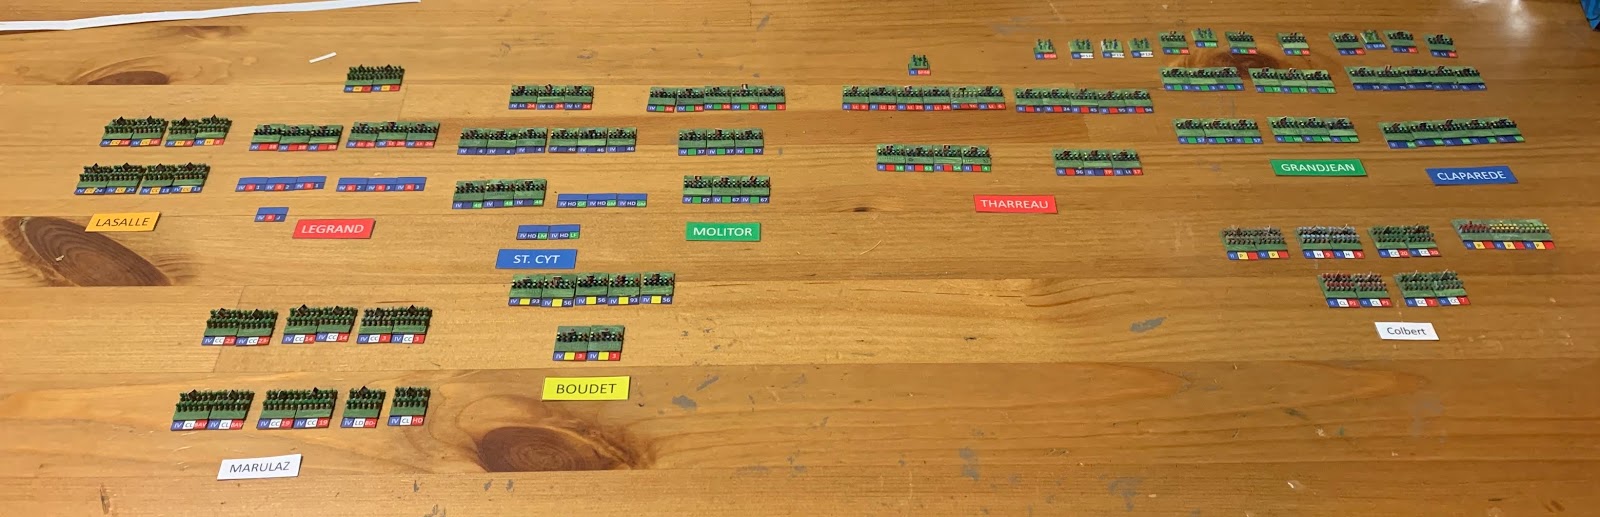 I have a trip to the mountains coming up, so I probably won't get much more done until this coming Monday (a US holiday that I get off work for). I'll be putting in some max effort towards finishing up everything next week. I'm really looking forward to seeing this set up on the map. Link for higher res: LINK |
|
|
|
Post by zeitsev on Feb 12, 2020 21:19:40 GMT
Zach - Very nice. What are the specific models you used, what size frontage in mm and what are the base sizes? Thx.
|
|
|
|
Post by Zach on Feb 12, 2020 22:05:51 GMT
These are all from the Forward March Micro subrange in the Library (about a dozen files towards the bottom half of the long list of figures). French and "normal" battalions are 12mm squares with 13 figures (12+officer). Austrians are 25 figures (24+ officer). These are designed to be used with 10mm = 100m scale, which is what my panel maps (at Gumroads) are sized at. So, if you place the Austrians on the Wagram or Marengo panel maps, they'll have exactly 200m frontage on the map, which is a good average for the Austrian battalions at the battle. The French work out to 120m, which also averages out pretty well for most of the divisions. The Army of Italy was so under-strength that I combined two or even three "battalions" of men into each regular French battalion for the purposes of making the labels.
Of course these particular figures could be used for other purposes. The idea is that they're about the size of hex-and-marker markers, which allows them to be used in games that are hybrid in scope between the two traditional styles of games.
I'm trying to work on a comprehensive system for using this particular sub-range that will include rules, how-to, and maybe even it's own website. I want to incorporate my organizing system into it, maybe by making the OOBs for many battles and campaigns available for download by players. The color-coded system allows for very quick set-up. It only takes a few minutes to set up three corps with the system I'm using. The labels for Wagram will definitely be made available when I'm finished with it (it's going pretty fast but it does take time to set up all of those labels).
I may do Waterloo and the surrounding area in the same scale next. I need to look at a map more closely, but I think that I could capture most of the battlefields around Waterloo on a map if I use the same scale.
|
|
|
|
Post by zeitsev on Feb 12, 2020 23:10:49 GMT
Bring us more pictures - especially close ups of the units! Great stuff!
|
|
|
|
Post by 6mmfan on Feb 14, 2020 7:34:58 GMT
Wow great output!
|
|
|
|
Post by Zach on Feb 18, 2020 7:27:50 GMT
Well, I got some more quality work done on the Wagram project over the weekend, but I didn't quite get it done. I still need to glue the labels on the Austrians. But I did finally - FINALLY AFTER YEARS - complete the French army. Here's pictures of roughly half of it: 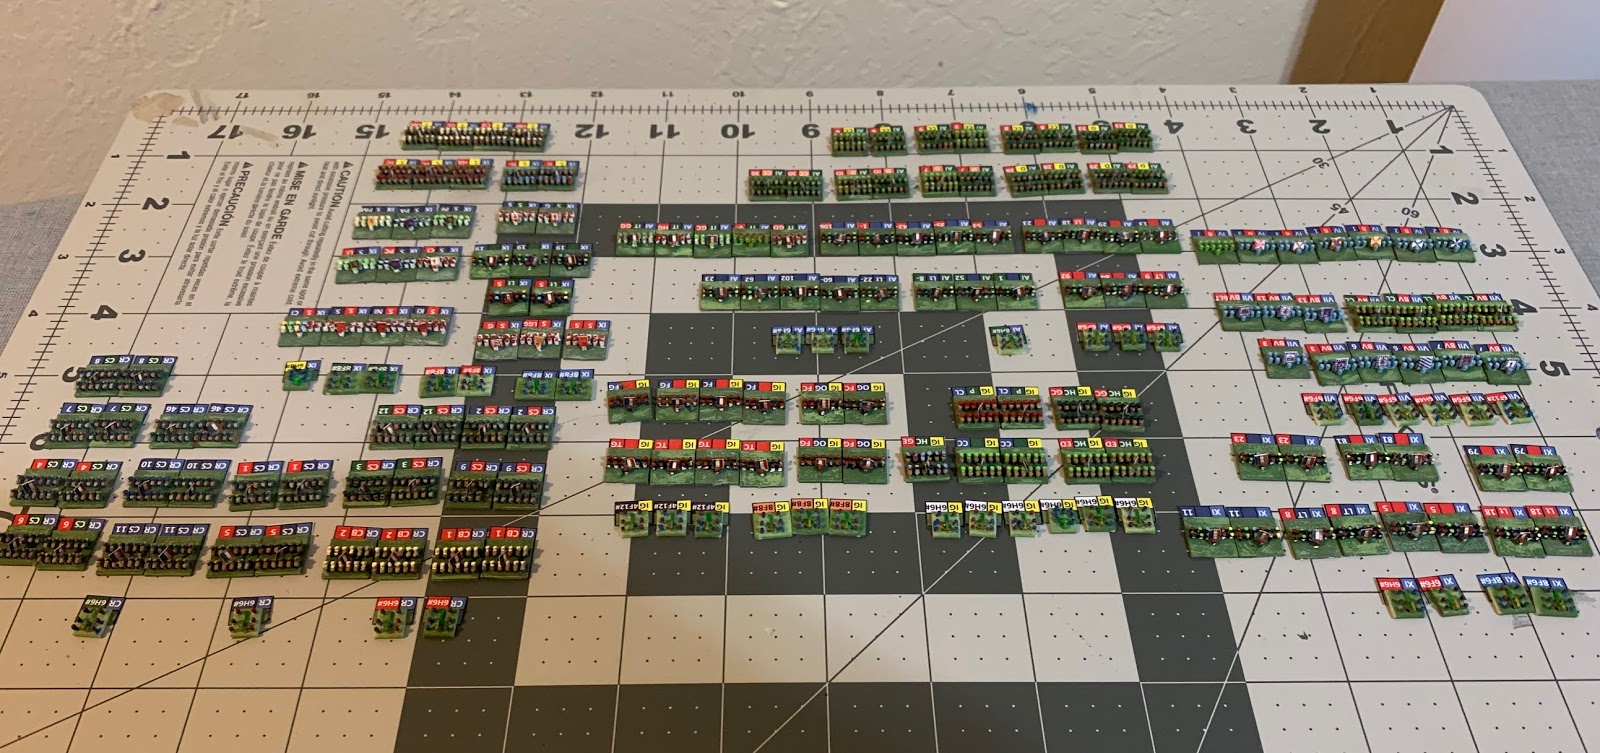 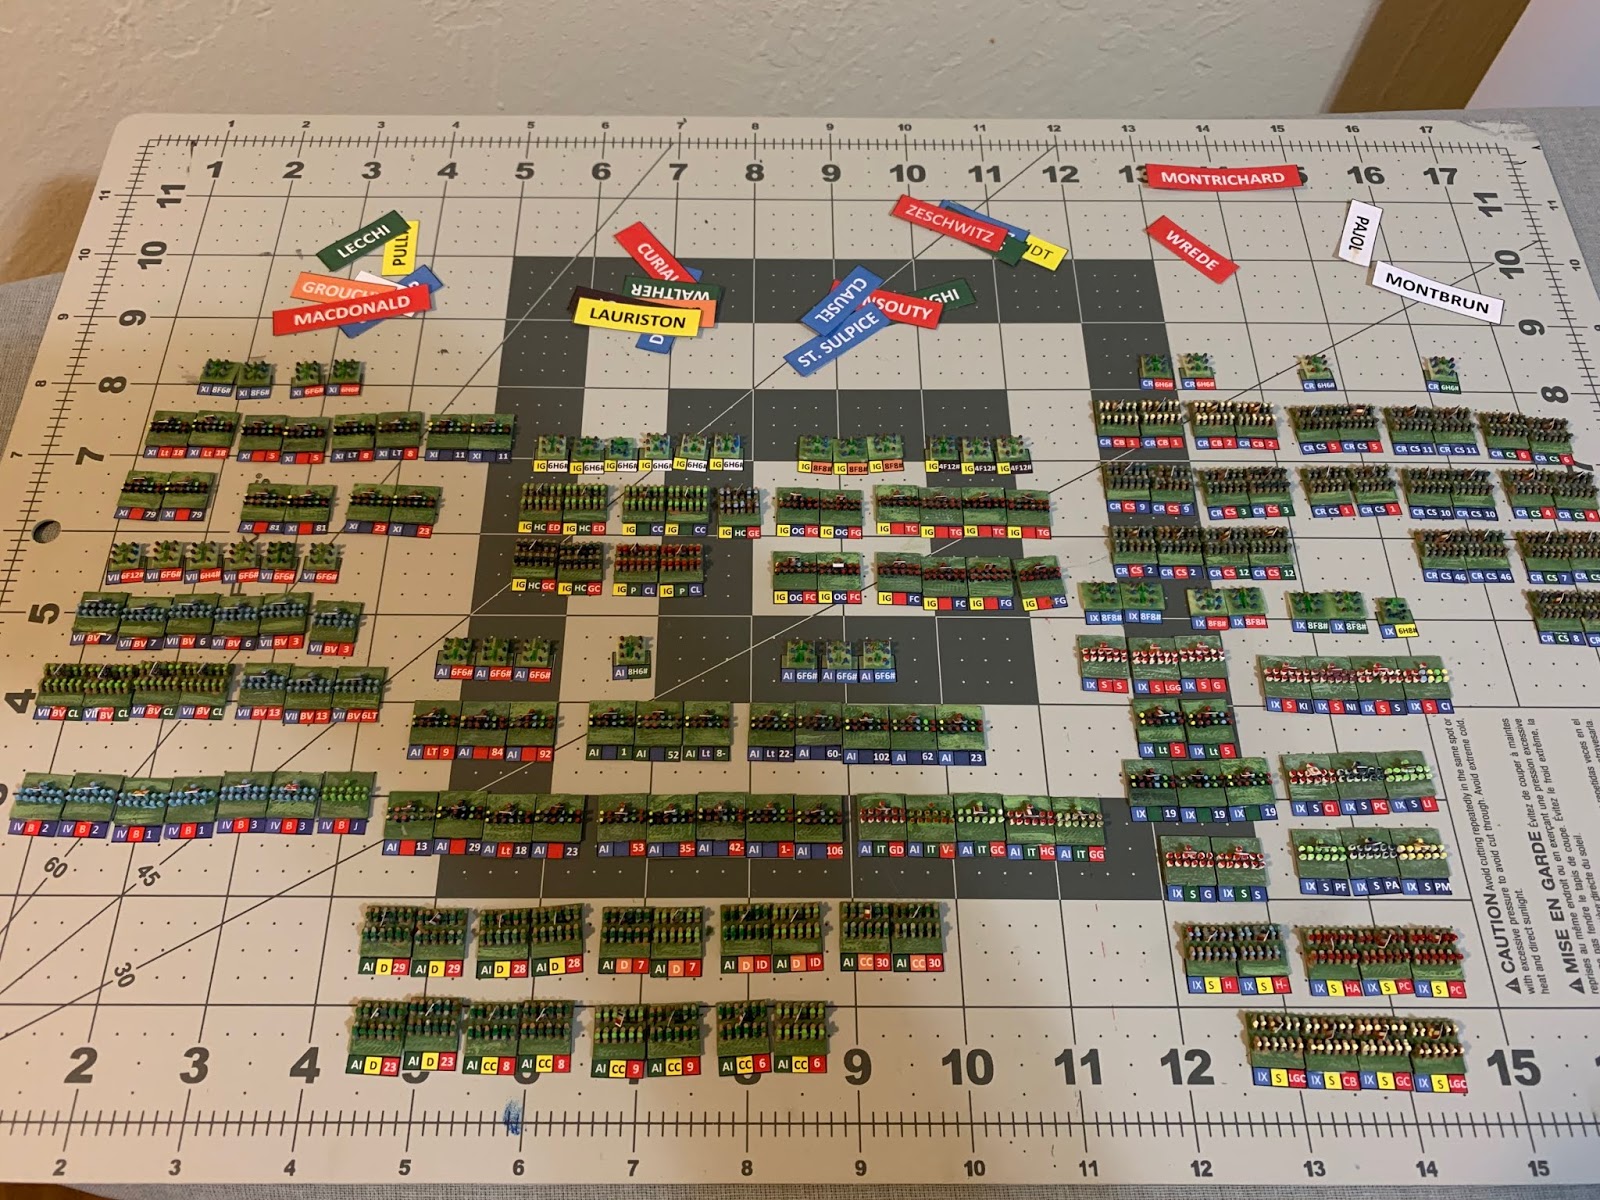 I also put the map together this weekend:  This was actual work... 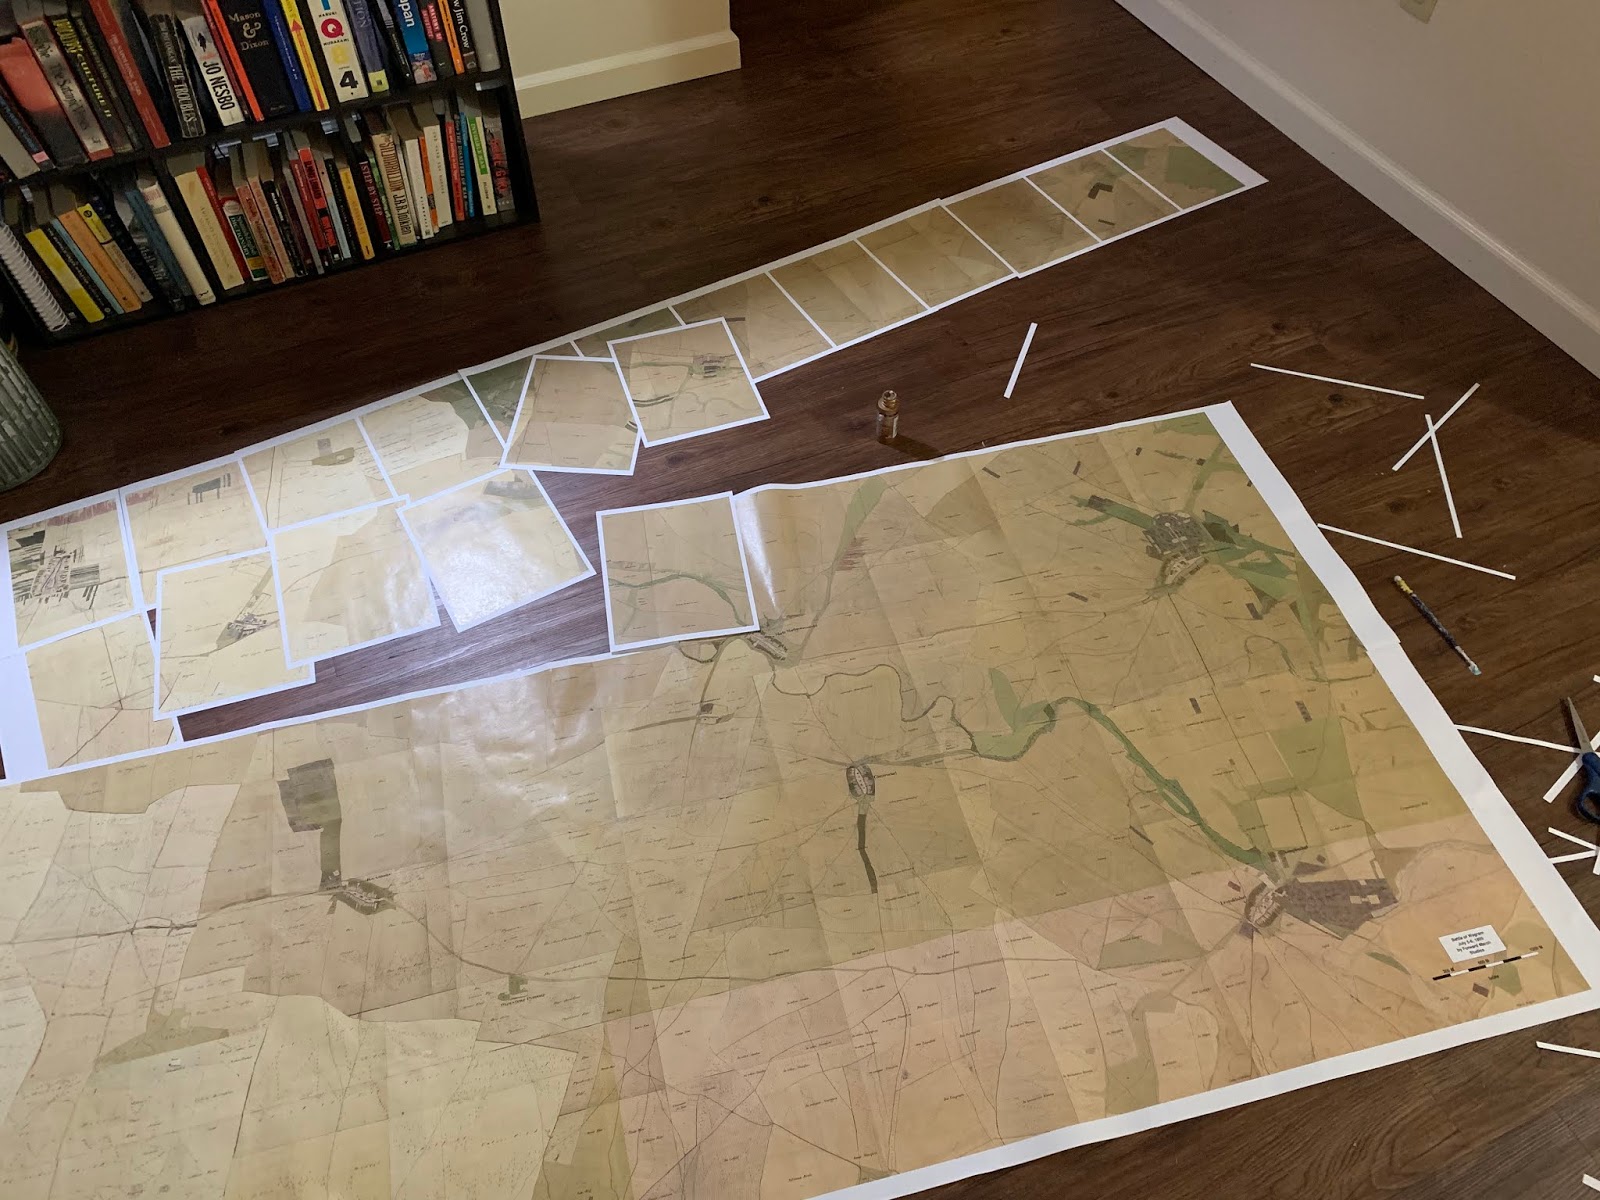 Here's the entire map. 9' x 4': 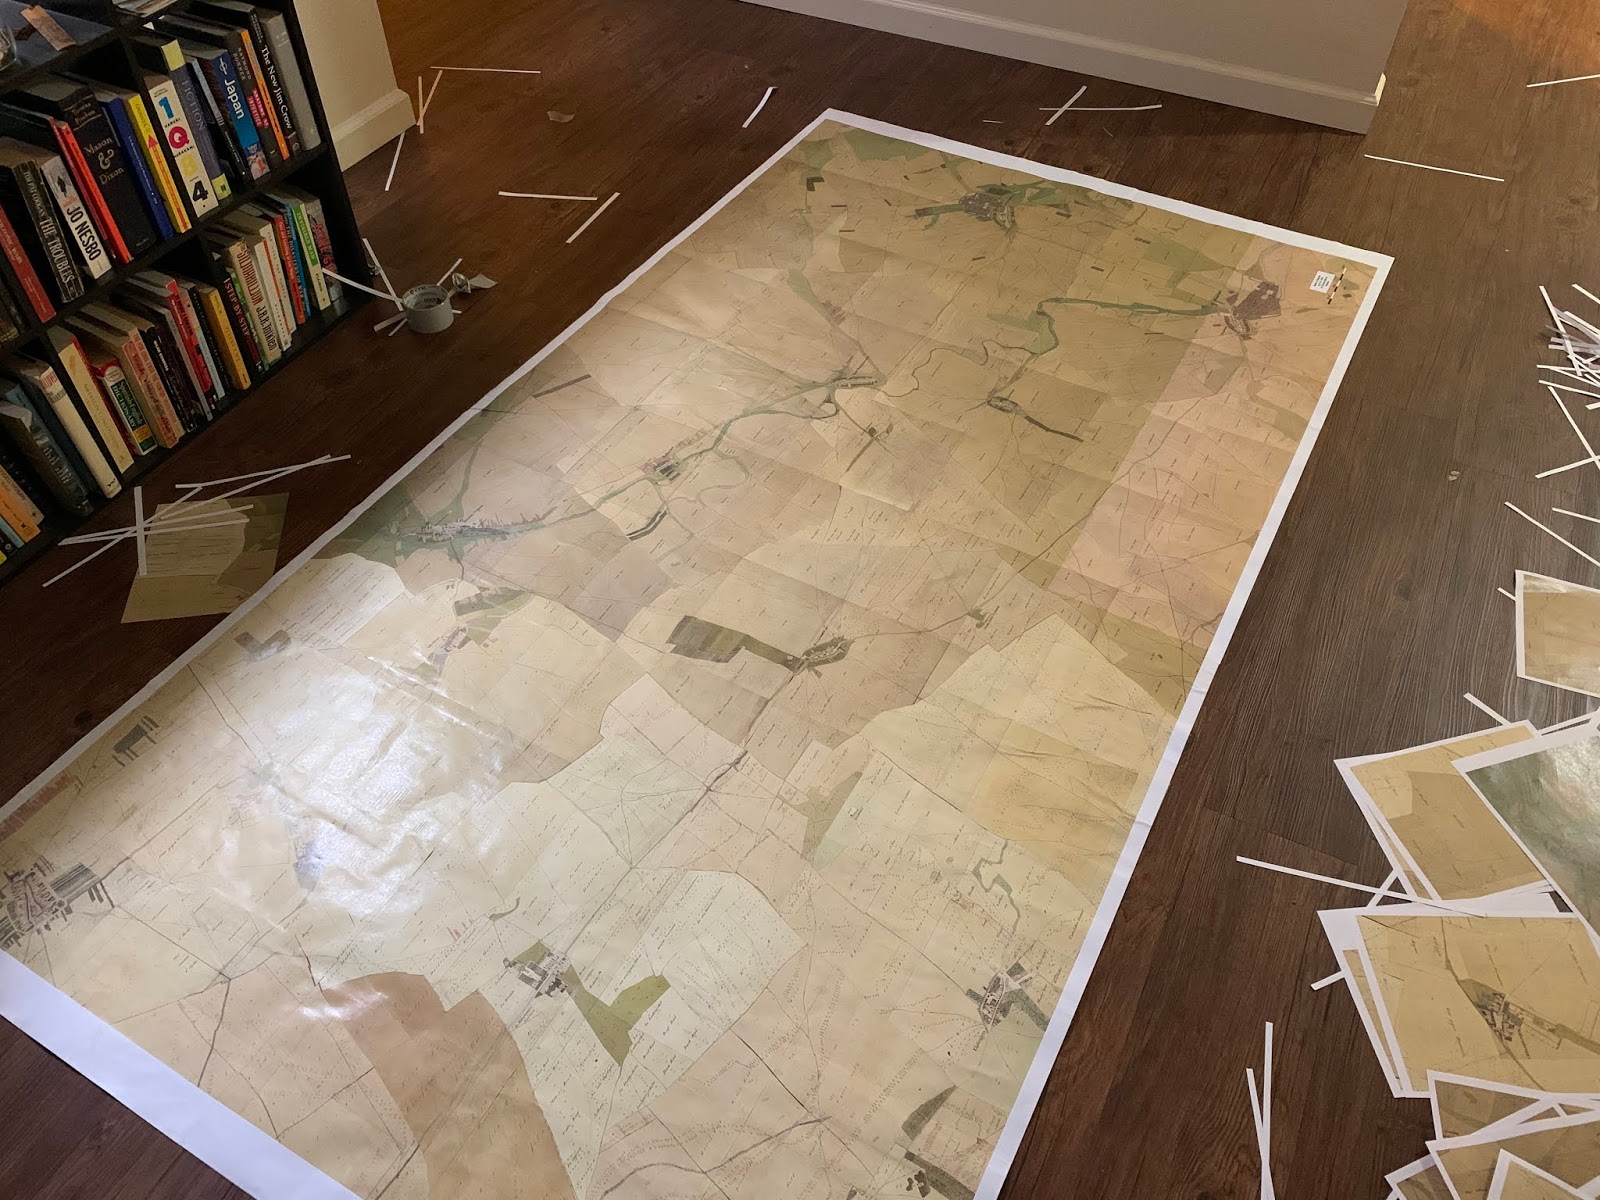 After gluing the pages together I flipped it over and then covered the back in duct tape to strengthen it. I'm trying to figure out what kind of clear sealant I could put over top of the map itself to protect it. In the military we used this stuff called "sticky back" to protect our maps, but it's kind of difficult to use and is prone to air bubbles. And the last things I want to do is to screw up this map. When playing actual games it will be placed under plexiglass, which tends to hide minor blemishes, but still, I don't want this thing tearing anytime sooner after spending half a day making it. Any suggestions? Another thing I may try is to chop the image up into fewer, larger pieces. It was quite cheap to print - it only cost me $25.00 for the print. Ad another $15 for duct tape (3.5 rolls), and it's still a bargain compared to a vinyl banner print. But it really is a project in itself to get it all together. Honestly, if you were going to use this for a convention game (which this is destined for), you'd b best off using pins to stick the panels to a piece of foam board or cork, then putting plexiglass over top of it. It would avoid warping, and the plexiglass will hide the breaks between pages. Then when finished you just pull out the pines and collect up the pieces of paper. I suppose I could hang this on my wall though, which might be interesting. It's got to go somewhere though. It is a very dominating object, sitting on my living floor. |
|
|
|
Post by bayernkini on Feb 18, 2020 7:57:38 GMT
Hard to evaluate the map only of the picture here, but i think, it´s a little bit pale and you need to highlight final
the terrain essentials a little bit (roads, rivers, wooden areas e.g.).
Another idea, what i just do/plan with my "plexiglas-hybrid-maps", is underlay a nice suitable game mat below the plexiglas and use then your map to paint on the essential terrain features on top of the plexiglas (i hope i could it say any understandable with my bad english).
And the best suggestion/implementation would be (which i do only for promotion tables for CON´s), let make a complete (digital) customized map-file. I did this already and can suggest Ivan Golyenkow.
Send him your map sketch, tell what size/scale you plan and which general terrain style you want. This may be a little bit more expensive, but looks incredible. See this exaple, i sent Ivan the Vicksburg campaign sketch (from Altar of Freedom website)
and got then this digital file, which i used then also, to let print a game mat
|
|
|
|
Post by Zach on Feb 18, 2020 19:00:06 GMT
I've seen his stuff around Facebook- very nice looking. A bit dark sometimes, but still very nice. And very good choice of campaigns; Grant's Vicksburg campaign is of great interest to me. I'd like to do some ACW buildings specifically for that. It's one of the most inventive, impressive examples of military maneuver in American history. Shame he couldn't have done similar in the East. For me it's an interesting challenge, because I'd have to create railroads, river ports, fortifications, ironclads and other boats, and a whole lot more.
The printed map above did come out a bit pale. I've printed it twice, actually. The first print was only a test print, and it was a bit darker and had more intense colors. That said, the above picture probably more accurately reflects the original map. You can't really see all of the details, which are quite impressive IMHO. You can see individual buildings, small copses of trees, and the like.
|
|
|
|
Post by oldskirmishman on Feb 18, 2020 20:02:18 GMT
Could you have it laminated?
|
|
|
|
Post by bayernkini on Feb 19, 2020 9:26:07 GMT
Looking forward to those in really joyful anticipation!
|
|
|
|
Post by zeitsev on Feb 19, 2020 17:33:44 GMT
For mounting 8 1/2" x 11" sheets to use as a mapboard, I've used Scotch brand Super 77 Spray adhesive.
The sheets get affixed to either cardboard or foamboard. Affixing from the center out seems to work best.
Alternatively, you might just keep the sheets you've already assembled rolled up and just use plexiglass sheets atop them.
That's a lot easier to transport than large mounted boards.
I'm currently doing a project similar to yours, having resized a hex map of a Borodino board game to accommodate 20 mm-fronted Megacats.
I'm mulling cutting the hills out and mounting them on foam core to achieve a 3d effect.
Also, you also might try using your home printer to print things at a reduced cost. I have a Canon printer and the cost of cartridges was very high.
So I tried using far less expensive non-Canon brands available through Amazon. They work just fine.
I forget to add this regarding your map shading/ color issues. Open the picture in MS Photo. Across the top you'll see a menu. Click on ' Edit and Create'. On the new screen that comes up, click on 'Adjustments'. On the right will appear several bars for adjusting Light, Color (intensity) and Clarity (Contrast/sharpness). Play around until you find settings that you like and save the map. It also has a feature to 'Crop and Rotate' so you can rotate the map and chop off/eliminate unneeded portions of the map. Very handy for focusing in on just the critical portions of the map, and giving more space for resizing the map to make it larger.
When you are ready to print, I use MS Paint to size the map I want in 8 1/2 x11 sheets. To do this open the map jpg or whatever; click "File" at the top; click 'Print' and up will come a drop down menu. Hit Page setup, and you can size the map in various numbers of sheets. To view the potential output, hit 'save', then use 'print preview" which will be found on the same drop down menu. And of course you can use the drawing features in Paint to highlight villages, roads, etc.
The free program Paint.net has a recolor feature which can replace base colors of the map from say, tan to different shades of green. I don't know how to use it very well so I cant give you better instructions, but it is a feature which might be useful to you.
R/ - zeitsev
|
|
|
|
Post by Zach on Feb 19, 2020 17:34:36 GMT
Could you have it laminated? Probably difficult, given the size. It also has to be roll-able, with tape on both sides, that might be difficult. I may have to eventually print a vinyl banner version. Now, if someone wanted to do this independently, what I'd recommend is to print out the panels and use pins to stick them to some foamcore. Then place the plexiglas over top of the foamcore. This could be done much faster than what I did, for example, if one wanted to travel to a con and then print the map out once you arrived. I will look at making the maps available in standard poster-printer dimensions. If I could break the Wagram map into 4 x 24" x 48" strips it would be much easier to glue together than 60 x standard pages. |
|
|
|
Post by zeitsev on Feb 19, 2020 18:10:05 GMT
To make sure you can transport your multi-piece map without the tape coming off, consider using cheap paper in large sized rolls as backing.
Staples and Michae'ls sells inexpensive rolls. You might even use unwanted wrapping paper.
Affix your map to the large paper with spray adhesive. When done, you should be able to roll up the whole map.
One last thing. You know that you can assemble several map sheets in Paint, right? You open one instance of Paint; using the resize command and expand the white background field by pulling the edges out; open another instance of Paint with a different map sheet; copy that; and paste it into the large sheet. Its tedious but it works.
|
|
|
|
Post by bayernkini on Feb 20, 2020 7:10:59 GMT
Probably you wrote it already and i overlooked it, but which rules you want to use?
|
|


